Podcasting is a time consuming hobby, but it's also a highly enjoyable one. I love listening to a range of podcasts on a variety of topics from history, to science, technology and, of course, games.
One of the questions I have been asked quite a lot is 'how do I start a podcast?' This is a question I am going to try and briefly cover in this post.
Planning:
Podcasts require planning, you need to have an idea of what you want to cover and how you want to cover it, as well of course as a solid grasp of your intended audience.
You also want to have some solid plans about how you're going to structure your podcast. Some podcasts are free-flowing discussions, some tightly scripted and with a variety of specific segments. You need to pick a style and structure that works for you, both one that you like, one you think your audience will appreciate, and one that you can manage. The more pieces that need to be fitted together, the more time it will take, but variation can also make a podcast easier to listen to and more engaging for the listener.
Recording:
If you are recording on your own then it's between you and your microphone. If you have co-hosts or guests, then you need to work out how to get their audio as well. If your co-hosts are in the same room, then it's just a matter of getting together and hitting record (oh, and making sure your microphone settings can pick everyone up). If your co-hosts (like all of mine) live elsewhere in the country or world, then you need to manage two vital things: scheduling, and recording.
I use Skype when recording with my co-hosts, I've also known people who use Google Hangouts with great success, but I have never tried it. Scheduling can be a big issue, most of the people I have worked with over the years live in different time-zones, and working out a consistent time to get together and record is important.
As for actually recording the audio... there are several ways to do this, some programs exist that will record a Skype call, and some of them even split each persons voice (or call) into separate tracks. Splitting audio into individual tracks very useful when it comes to editing, if one person has a heater running in the room, a persistent cough, or a cat jumping around next to the microphone, then it's easier to remove those noises when dealing with that single person's audio track rather than a single track that includes everyone.
When I'm recording on my Mac, I have tended to use Call Recorder - this costs money initially, but works well. The only issue is that every call aside from my own is mixed into a single track. Similar programs exist for Windows.
Another common option with regular co-hosts or guests is to have everyone record their own audio files, the various files can then be sent to the person whose job it is to put everything together. This is a great way of maintaining quality - as long as everyone is using the same settings. It also makes it easy to manage everyone's tracks. However, it is the most work.
It might sound obvious, but when you're recording you want a nice quiet environment. Cars and heaters, fans, children and cats, these are all enemies of the podcaster. Pick somewhere nice a quiet. You can make your own little recording booth using acoustic noise removal foam and whatnot, I never got that deep, but it is certainly an option.
Get a reasonable microphone. I use a Yeti Blue microphone, and I think it's great. There are lots of good microphones out there - get a reasonable one, don't use the microphone on your laptop. Headset Microphones work ok, but a desk mic is better in my opinion. Don't sit the microphone next to or behind your computer, as it can pick up the noise of the fans, and make sure the microphone is set to record the space you are in, and no-where else (eg: if it's just you and your micrphone - cardioid mode will pick what's in front of the mic, but not the sides or behind - perfect for one).
You will also want some headphones. You can expensive noise-cancelling headphones from lots of places, I just use the earbuds I got with my phone and they have worked fine.
 |
| The candles are optional... but add a certain atmosphere. |
Audacity:
There are lots of different recording programs you can choose from, Garage Band is a popular one, I tend to use Audacity. Is Audacity the best? I don't know, it's the one I am familiar with and has worked well for me in the past. Audacity has some little quirks, like the fact it won't pick up your microphone unless it's plugged in before the program is opened, but it is excellent.
Make sure you head to 'Edit' and 'Preferences' to select your microphone, obvious? I did say this was an amateur's guide.
This is Audacity.
Once you have everything set up it's as simple as hitting record and recording...
Save often.
Mmm, some nice audio there.
Of course, after you record you need to edit, to edit I usually zoom the audio so the time track is in seconds, this seems to be the easiest for me to work with.
Save.
Select a piece you want deleted and hit backspace - gone! Ahh, the magic of technology.
Editing is a pain in the neck. I despise editing with the passion of a thousand newly formed stars. Editing is, however, required. Go back through your and everyone else's audio tracks and remove or silence the excessive umms and ahhs, the long pauses, the mistakes, the pops and coughs, the time Daryl took a sip from his bottle of beer and the sniffling of Emily due to her cold. Save. If you are working with several audio tracks you need to make sure you keep everything nicely synced up as you do it. Cut 3 seconds from one track, the others need to be adjusted to accommodate this. Save.
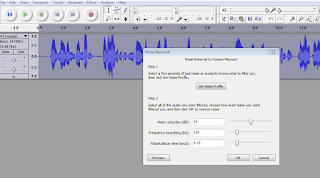
Sometimes an audio track has a persistent background noise, an incessant buzzing noise that makes you want to bite things. Noise Removal is your friend, but be careful, it can be a fickle friend. The first thing to do with noise removal is to select a piece of the audio track that represents the background noise, and the background noise only. Do not, I repeat, do not select a piece of audio where someone is speaking. Dreadful things happens to those that do. After you have done this, go to 'Noise Removal' under 'Effects' and click 'Get Sample'.
Once the sample has been taken, get out of Noise Removal and select the entire audio track (or part affected by the buzzing noise that is clawing at your senses). Go back into Noise Removal and click 'Ok' at the bottom. You can mess with the settings, but that is for advanced people unlike myself.
Save.
Oh yes - use the Time Shift tool to slide an audio track left or right to line it up.
Save.
Leveling:
Once you have experienced the blood chilling, mind-numbing drudgery that is the editing process, and all is well with your podcast so far (save), you need to add in bumpers (if any), ads (if any), music (if any) and the intro and outro.
If the audio track was all recorded through the same microphone - ie: it was you, or you and some friends, then you probably don't need to level it. If, however, the audio is several people via Skype, or one person was particularly shy, or a microphone somewhere was turned down, then you should level the audio. Leveling is basically evening out the sound, making the quiet bits louder and the loud bits quieter so the gentle listener doesn't turn the podcast up when soft-spoken-Sven is on only to have his ear-drums perforated when Loud-Laughing-Larry starts to guffaw.
I use a program called Levelator, which I think is no longer supported. But there are plenty of options out there that you can find with some google-fu.
If you planning to level the audio, do so before you add in any music. To level with the Levelator you need to export your edited track/s as a .wav file. Once done you can drag and drop the file onto the Levelator, which will do its thing and leave you with a second track with the added '.output' to the file name.
Import the .output file back into Audacity, and now add any music and whatnot as required.
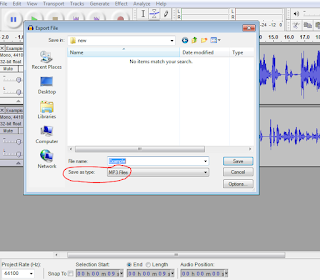
Again - use the Time Shift to make everything line up nicely. Once that is done, export the file as an .mp3, add any tags you feel are required (I always use the tags, as it's an easy way to track episodes on my player).
You have a prospective podcast episode!
Hosting:
Now to upload it to your host, where it will be listened by your million adoring fans.
Ah yes, hosting. A podcast host is a web service that hosts your audio files. There are lots to choose from, Soundcloud, Podomatic, Podbean... Generally they will all cost money, and in return provide you with a hosting service and RSS feed, and usually an upload limit of some sort. I used Libsyn with the Element 270 podcast, and it worked fine. For $15USD per month I had an upload limit of 250MB per month. Seems enough, but generally every minute of your show = 1MB, if you do two to three long episodes in a month, you can easily hit that limit. Pick a host that fits your budget and your intended schedule.
Once you have your host you have an RSS feed which you can plug into iTunes or any other reputable podcatcher! Well done!
Phew. If you have managed to read to the end of that congratulations, you deserve some sort of medal or award. However, having spent all my hard-earned money on microphones and hosting services, you are going to have to use your imagination.
In any case - that is the quick and dirty amateur's guide to doing a podcast thingy, I hope it is helpful to someone!


