Monday, 17 June 2013

A mysterious island...

In the build up to the recent engagements between the Russian Coalition and my Covenant of Antarctica forces I not only wanted to get my fleet painted, but ensure the playing surface was also suitably attired for the formality of the situation.  I previously wrote about making the board, this post I'm going to talk about the islands I made.

Really, I wasn't so creative as to have conjured the methods for making these from the air, I took the ideas from two places - the ideas for the forests were taken from this wonderful post over at the Spartan Games website.  The ideas for the islands were taken from the Dystopian Wars Australia group on Facebook (and I'll henceforth refer to them as Lewis islands for that reason).

So, after reading both these posts I decided to make my own islands.  firstly I made a frame for the forest foliage, filled it with Woodland Scenics clump foliage, and liberally soaked it in PVA.


A nice mix of dark and light to add some variation.
I then purchased some cork tiles, and by a mixture of tearing them with my hands and pliers, and cutting them to have a bevelled edge with a craft knife, I had the following:


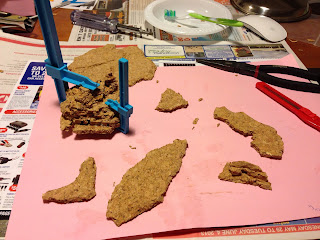
The islands in the foreground - a mixture of cut edges and torn edges -  the cut edges will be painted as the rest of the island, while the torn sections will be painted as rock.

For the sea rocks/mounts I glued several layers of cork together, and the tore and cut away at the sides until it looked more uniform.  In retrospect I'd have glued, then cut them away.  As they are they look like so many layers - and while some of this is ok, there is too much.
I had to decide how to manage the forests.  Being cork board I decided to use some small wood tacks - press them into the cork far enough to hold but not all the way through.

The flat top surfaces of the tacks would be a good base for the glue that would hold the foliage to the trunks.
An undercoat in black later:


The rocks were drybrushed in successively lighter layers of gray, from dark to light, and finally a very light drybrush of white.


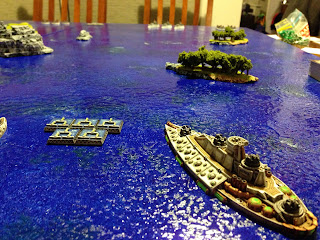
The final coat of white really helps to delineate the edges and make the whole thing look better (in my opinion).

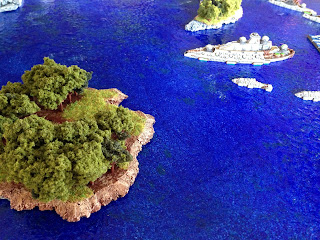
The islands on the other hand received a heavy coat of a rich dark brown:


I then drybrushed, heavily and progressively lighter with different shades of brown.  Finally a light flesh tone.  Of course - the rock was done the same as the rocks above.  Finally I added some static grass:


On the largest island here I left a large open area, eventually I'll grab some Spartan town pieces to add there - just a manor house I think...

Finally I used some Woodland Scenics Hob-e-Tac glue - on top of each tack head.  Then once this had set sufficiently I pulled the foliage I had made earlier apart and pressed it onto the tack heads.  I tried to get some nice variation in tone across the islands, and I think they came up very nicely.


Well - that's that for now.  Thanks to the guys on the Spartan forums and DW Australia for the inspiration!  I think my Lewis class islands cam up well!  I'm thinking of using the remaining cork tiles to construct a variable land board I can lay over my sea board so I can add the land battles aspect to my DW games, though I don't have any land units yet...  We shall see!

Cheers,
Giles.


Tuesday, 11 June 2013

The Covenant and the foe...

This weekend my brother and I, in amongst what was also a nice family catch up, managed to square off for a couple of games of Dystopian Wars.

It was nice to be able to finally field an army for something, anything, that was fully painted, and to play on a board and with terrain that also looked good.  I'll be doing up a blog post about how I made the islands and so forth in the next few days, but in the meantime, here are some shots of the games.

Our first game was a simple 600 points, really a learning game to brush up on the rules (and we needed some brushing).
The game looked really nice, in my humble opinion, much worth the effort.
My plan was to use the Ptolemy bombers as mine layers and block off some of the gaps in between islands, allowing me more time to land shots as the Russians tried to close.  It wasn't as successful or brilliant as I had hoped.
Flying under an immense hail of AA fire, these bombers survived the squadron of fighters; managed to wipe out the Russian Novgorod frigates by dropping a mine squarely in the center of their line; and one of the two managed to survive flying over the decking of the lurking Borodino.

The first game ended basically a draw, I managed to knock out the required points to scratch a win for the Covenant, but with the wounded Borodino steaming down towards my injured Aristotle Battleship and whatever scraps I had left it was really anyone's game.


This game was basically all in - both of us fielded some 900 points (which was what we bought as our first foray into the system - basically a box set and a flying carrier each).  My goal this game was to keep my Epicurus back and use the recycling drones to as much effect as I could.  I should have deployed them in the center as I would have had more choices about what to do with them, as it was stuck on the flank, they never really contributed.

The Might of the assembled Russian Coalition, including their fearsome looking Zamiec...

I hoped that a couple of linked torpedo barrages at close range from these Diogenes Frigates might crack the ablative armour of the stout Russian Cruisers across from them... sadly some unlucky rolling meant little was achieved by their valiant deaths.

While the fighting was heavy and bloody on this flank, it really had little impact on the main event, which involved the Russian Cruisers, Zamiec and Borodino...

A wing of my fighters heavily damaged one of the Russian bombers,  it's ablaze but still limping along.

One of the more amusing moments in the game - the Borodino ploughed into and through my poor little Diogenes Frigate.  I think the twisted wreckage of my flaming ship barely scratched the Russian paint work.  He could have assaulted and prized her... no, he wanted to test the ram.

The second game went badly for me, I gambled on being able to break the ablative armour of the Russians with some quick assaults, and while my Battleship and Cruisers were nicely positioned, the failure of my frigates to break even some of the Russian armour meant, I think, my demise.

We didn't get to finish this game, but it would have been great to see how it would have swung, I had the Cruisers and Battleship ready to heave to and deliver broadsides on the enemy, as well an Epicurus and its fleet of drones ready in the wings.  He had his cruisers, mostly still with their ablative armour intact, and of course his Borodino (a fearsome ship) and the mighty Zamiec...

I feel the odds were stacked against me, so I'm happy to concede a loss.

Good games, and a lot of fun.  I'm already looking forward to the next game.  I had originally intended that when I get around to getting some more Dystopian Wars stuff - that I spread out and grab a couple of different fleets.  Now I'm really thinking I'd like to expand on the Covenant, and maybe invest in one other fleet...

Perhaps an Aussie fleet... those pocket battle ships and crocodile attack subs look a lot of fun!

Cheers,
Giles.


Thursday, 6 June 2013

Saxon Real Estate...

One of the things my tub of terrain is missing relates directly to architecture - I have no buildings of any sort.  Now, I'm not adverse to placing an old coffee cup on the table and calling it a wizards tower, but when I've gone to the effort of making everything else look ok, the buildings should too.

Enter 4Ground, a company that makes laser cut terrain kits of all sorts.  I have to say straight up, that they are easy to put together and look great.

In any case - here's a small collection of photographs to give you an idea of how they come together:

The buildings I got where the Saxon/Late Medieval Dwelling (15mm scale), and the Anglo Danish Dwelling (15mm)

The pieces punch easily from the sprues.

PVA throughout... The doors can be removed and glued in ajar, or  attached some other way.

The exterior panelling is prepainted, and looks rather good too I think.


Looking good...

This step made me most nervous.  Using an old toothbrush I ran the bristles down the pitch of the roof smearing in the PVA.  This makes the felt harder and stay better (I imagine), but also makes the hairs look like they are coming down the pitch of the roof.

Two buildings in about 20 minutes.  Both looking great in my opinion.

For scale.  The miniature on the far left is a 10mm Saxon, the Otter in the center is from the 18/20mm Splintered Light Range, and the rat at the end a 28mm Reaper miniature (I think it's Reaper).  The buildings are ideal for 15-20mm scale figures, but work well enough for any of those scales I think.

Well that's that.  The houses look great in my opinion.  The came together very easily, are cheap, sturdy, the roof of each can be removed if the players so decide, oh, and they look very nice.  I'm hoping 4Ground do a Saxon Church in 15mm at some stage, but for now these will fill whatever real estate requirements I need.


I should add, these will find use in Song of Blades and Heroes, Song of Arthur and Merlin, and hopefully at some stage in Dux Britanniarum, and Dux Bellorum.

Cheers,
Giles.


Monday, 3 June 2013

The 8th Sea...

Dystopian Wars, for those who have been following my blog, is a miniatures table top wargame by Spartan Games that manages to neatly and succinctly cover three theaters of war in the one game - land, sea and air.

I am predominantly interested in the sea and air parts of the game.  For a while I was content with an old blue sheet thrown across the table top - this was enough!  And then, as so often happens, one stumbles across something someone clever has done on the internet.  In my case it was the following YouTube video:


Thoroughly inspiring stuff for an intrepid explorer feeling his way back into the miniatures game hobby.

So with little forethought and a similar level of planning I decided to try and do the same myself.

Firstly I was in need of the actual board - no sooner had this realisation popped into my head than I was  at the local Bunnings (hardware) store looking for required materials.  I bought two 2x4ft pieces of particle board, as well as the other sundry items featured in the excellent video above.


I undercoated these with some help...

Work minion! Ahh, this is what having children is all about!


A week later, when the weather seemed more appropriate to the drying requirements of paint (tricksy stuff), I base coated the boards with an acrylic blue, then using a torn sponge the lad and I added some turquoise, then a smattering of light blue, and finally a very small amount of white - we were trying for a stippled effect - at least I was.  The minion was simply belting it on.

Base coat...

The turquoise...

...and light blue...

...and the painting element is done.
With the painting done it was time to admire the achievements of the day thus far.  That done, I progressed to the next stage, the use of glass coat.  Glass coat is something I had never heard of until I watched the video above and tried to use it myself.  All I can say is that it is extremely thick and tacky as it goes on, really needs a nice warm environment to dry in, but adds a fantastic effect to the board.


Once the glass coat had been painted on with a brush I dabbed it with a dry sponge to add a stippling effect and to make sure it didn't simply dry ultra smooth like it's meant to.


Overall I'm very happy with the result.  If I had my time again I think I would use a thicker paint for the base, and perhaps roll it on.  I'd choose a slightly lighter mid-tone (rather than turquoise) and be more sparing with the lightest (white).  All that said, I won't be rushing out and making another table tomorrow, I'm very happy with how it's all come together.  Hopefully I'll get a game in very soon, and have a chance to see what it looks like with islands, ships and flying... things... all over it.

Thanks Viv for the inspirational YouTube vid.  Mine isn't a patch on your tables, but is miles better than the old blue sheet!


Cheers,
Giles.